In order to provide good inpatient care, hospital policies and working practices should promote the basic principles of child care, such as:
- communicating with the parents
- arranging the paediatric ward so that the most seriously ill children receive the closest attention and are close to oxygen and other emergency treatments
- keeping the child as comfortable as possible and controlling pain, especially in invasive procedures
- preventing the spread of hospital-acquired infection by encouraging staff to wash their hands regularly and other measures
- keeping warm the area in which young infants or children, especially those with severe malnutrition, are being looked after, in order to prevent complications like hypothermia.
10.1. Nutritional management
Health workers should follow the advice on counselling in sections 12.3 and 12.4. A mother's card with pictures of the advice can be helpful for the mother to take home as a reminder (see Annex 6).
10.1.1. Supporting breastfeeding
Breastfeeding is most important for protecting infants from illness and for their recovery from illness.
- Exclusive breastfeeding is recommended from birth until 6 months of age.
- Continued breastfeeding, with adequate complementary foods, is recommended from 6 months to ≥ 2 years.
Health workers treating sick young children have the responsibility to encourage mothers to breastfeed and to help them overcome any difficulties.
Assessing a breastfeed
Take a breastfeeding history by asking about the infant's feeding and behaviour. Observe the mother while breastfeeding to decide whether she needs help. Observe:
- how the infant is attached to the breast (see next page). Signs of good attachment are:
- –
areola visible above infant's mouth
- –
mouth wide open
- –
lower lip turned out
- –
infant's chin touching the breast
- how the mother holds her infant (see next page)
- –
should be held close to the mother
- –
should face the breast
- –
body should be in a straight line with the head
- –
whole body should be supported
- how the mother holds her breast
Overcoming difficulties
1. ‘Not enough milk’
Almost all mothers can produce enough breast milk for one or even two infants; however, sometimes an infant is not getting enough breast milk. The signs are:
- poor weight gain (< 500 g/month or < 125 g/week or infant weighing less than the birth weight after 2 weeks)
- passing a small amount of concentrated urine (less than six times a day, yellow and strong-smelling)
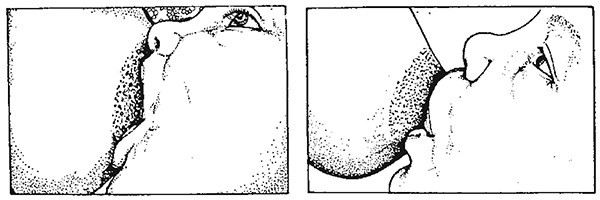
Good (left) and poor (right) attachment of infant to the mother's breast
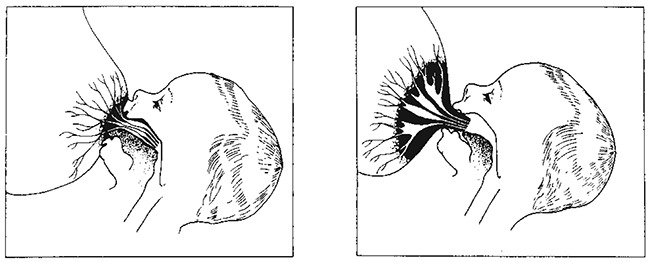
Good (left) and poor (right) attachment: cross-sectional view of breast and infant

Good (left) and poor (right) positioning of infant for breastfeeding
Common reasons why an infant may not be getting enough breast milk are:
- poor breastfeeding practices: poor attachment (very common cause), delayed start of breastfeeding, feeding at fixed times, no night feeds, short feeds, use of bottles, pacifiers, other foods and other fluids
- psychological factors in the mother: lack of confidence, worry, stress, depression, dislike of breastfeeding, rejection of infant, tiredness
- mother's physical condition: chronic illness (e.g. TB, severe anaemia or rheumatic heart disease), contraceptive pill, diuretics, pregnancy, severe malnutrition, alcohol, smoking, retained piece of placenta (rare)
- infant's condition: illness or congenital anomaly (such as cleft palate or congenital heart disease) that interferes with feeding.
A mother whose breast milk supply is reduced will have to increase it, while a mother who has stopped breastfeeding may need to relactate.
Help a mother to breastfeed again by:
- keeping the infant close to her and not giving him or her to other carers
- ensuring plenty of skin-to-skin contact between the mother and the infant at all times
- offering the infant her breast whenever the infant is willing to suckle
- helping the infant to take the breast by expressing breast milk into the infant's mouth, and positioning the infant so that he or she can easily attach to the breast
- avoiding use of bottles, teats and pacifiers. If necessary, express the breast milk and give it by cup. If this cannot be done, artificial feeds may be needed until an adequate milk supply is established.
2. How to increase the milk supply
The main way to increase or restart the supply of breast milk is for the infant to suckle often in order to stimulate the breast.
- Give other feeds from a cup while waiting for breast milk to come. Do not use bottles or pacifiers. Reduce the other milk by 30–60 ml per day as the mother's breast milk starts to increase. Monitor the infant's weight gain.
3. Refusal or reluctance to breastfeed
The main reasons why an infant might refuse to breastfeed are:
- The infant is ill, in pain or sedated.
- –
If the infant is able to suckle, encourage the mother to breastfeed more often. If the infant is very ill, the mother may need to express breast milk and feed by cup or gastric tube until the infant can breastfeed again.
- –
If the infant is in hospital, arrange for the mother to stay with the infant in order to breastfeed.
- –
Help the mother to find a way to hold her infant without pressing on a painful place.
- –
Explain to the mother how to clear a blocked nose. Suggest short feeds, more often than usual, for a few days.
- –
A sore mouth may be due to Candida infection (thrush) or teething. Treat the infection with nystatin (100 000 U/ml) suspension. Give 1–2 ml dropped into the mouth four times a day for 7 days. If this is not available, apply 1% gentian violet solution. Encourage the mother of a teething infant to be patient and keep offering the breast.
- –
If the mother is on regular sedation, reduce the dose or try a less sedating alternative.
- There is difficulty with the breastfeeding technique
- –
Help the mother with her technique: ensure that the infant is positioned and attached well without pressing on the infant's head or shaking the breast.
- –
Advise her not to use a feeding bottle or pacifier: if necessary, use a cup.
- –
Treat engorgement by removing milk from the breast; otherwise mastitis or an abscess may develop. If the infant is not able to suckle, help the mother to express her milk.
- –
Help reduce oversupply. If an infant is poorly attached and suckles ineffectively, the infant may breastfeed more frequently or for a longer time, stimulating the breast so that more milk is produced than required. Oversupply may also occur if a mother tries to make her infant feed from both breasts at each feed, when this is not necessary.
- A change has upset the infant.Changes such as separation from the mother, a new carer, illness of the mother, a change in the family routine or the mother's smell (due to a different soap, food or menstruation) can upset the infant and cause refusal to breastfeed.
Low-birth-weight and sick infants
Infants with a birth weight < 2.5 kg need breast milk even more than larger infants; often, however, they cannot breastfeed immediately after birth, especially if they are very small.
For the first few days, an infant may not be able to take oral feeds and may have to be fed IV. Initiate early feeding with small oral feeds even on day 1 or as soon as the infant can tolerate enteral feeds.
Very low-birth-weight infants (< 1.5 kg) may have to be fed by naso- or orogastric tube during the first days of life. Preferably give the mother's expressed breast milk. The mother can let the infant suck on her cleaned finger while being tube fed. This may stimulate the infant's digestive tract and help weight gain.
Low-birth-weight infants at ≥ 32 weeks' gestational age can start suckling on the breast. Let the mother put her infant to the breast as soon as the infant is well enough. Continue giving expressed breast milk by cup or tube to make sure that the infant gets all the nutrition needed.
Infants at ≥ 34–36 weeks' gestational age can usually take all that they need directly from the breast.
Infants who cannot breastfeed
Non-breastfed infants should receive either:
- expressed breast milk (preferably from their own mothers) or donor human milk where safe and affordable milk-banking facilities are available
- formula milk prepared with clean water according to instructions or, if possible, ready-made liquid formula
- If the above are not available, consider animal milk. Dilute cow's milk by adding 50 ml of water to 100 ml of milk, then add 10 g of sugar, with an approved micronutrient supplement. If possible, do not use for premature infants.
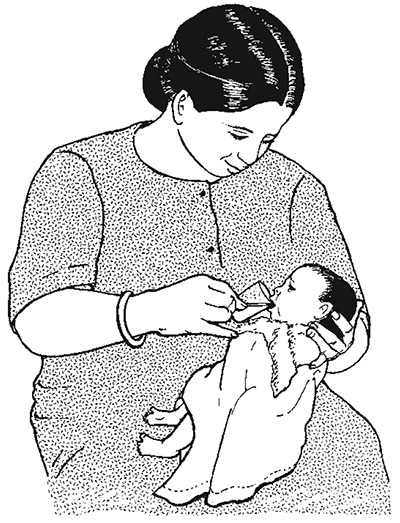
Feeding infant with expressed breast milk from a cup
Expressed breast milk is the best choice, in the following amounts:
- –
Infants ≥ 2.0 kg: Give 150 ml/kg daily, divided into eight feeds at 3-h intervals.
- –
Infants < 2.0 kg: See section 3.11 for detailed guidance for low-birth-weight infants.
- –
If the child is too weak to suck but can swallow, feeding can be done with a cup. Feed by naso- or orogastric tube if the child is lethargic or severely anorexic or unable to swallow.
10.1.2. Nutritional management of sick children
The principles for feeding sick infants and young children are:
- Continue breastfeeding.
- Do not withhold food.
- Give frequent, small feeds, every 2–3 h.
- Coax, encourage, and be patient.
- Feed by nasogastric tube if the child is severely anorexic.
- Promote catch-up growth after the appetite returns.
The food provided should be:
- palatable (to the child)
- easily eaten (soft or liquid consistency)
- easily digested
- nutritious: rich in energy and nutrients.
The basic principle of nutritional management is to provide a diet with sufficient energy-producing foods and high-quality proteins. Foods with a high oil or fat content are recommended; up to 30–40% of the total calories can be given as fat. In addition, feeding at frequent intervals is necessary to achieve high energy intake. For sick children, provide multivitamin and mineral supplements.
The child should be encouraged to eat relatively small amounts frequently. If young children are left to feed themselves or have to compete with siblings for food, they may not get enough to eat.
A blocked nose, with dry or thick mucus, may interfere with feeding. Put drops of saline into the nose with a moistened wick to help soften the mucus.
A minority of children who are unable to eat for a number of days (due, e.g. to impaired consciousness in meningitis or respiratory distress in severe pneumonia) may have to be fed through a nasogastric tube. The risk for aspiration can be reduced if small volumes are given frequently and by ensuring before each feed that the tube is in the stomach.

Chart 16. Feeding recommendations during sickness and health (PDF, 36K)
Table 31
Examples of local adaptations of feeding recommendations on the mother's card in Bolivia, Indonesia, Nepal, South Africa and the United Republic of Tanzania.
To supplement the child's nutritional management in hospital, feeding should be increased during convalescence to make up for any lost weight. It is important that the mother or carer offer food to the child more frequently than normal (at least one additional meal a day) after the child's appetite increases.
10.2. Fluid management
The total daily fluid requirement of a child is calculated from the following formula: 100 ml/kg for the first 10 kg, then 50 ml/kg for the next 10 kg, thereafter 25 ml/kg for each subsequent kg. For example, an 8-kg infant receives 8 × 100 ml = 800 ml per day, a 15 kg child (10 × 100) + (5 × 50) = 1250 ml per day.
Table 32
Maintenance fluid requirements.
Give the sick child more than the above amounts if he or she has fever (increase by 10% for every 1 °C of fever).
Monitoring fluid intake
Pay careful attention to maintaining adequate hydration in very sick children, who may have had no oral fluid intake for some time. Fluids should preferably be given orally (by mouth or nasogastric tube).
If fluids have to be given IV, it is important to monitor infusion closely because of the risk for fluid overload, which can lead to heart failure or cerebral oedema. If it is impossible to monitor the IV fluid infusion closely, the IV route should be used only for the management of severe dehydration, septic shock, delivering IV antibiotics and for children for whom oral fluids are contraindicated (such as those with perforation of the intestine or other surgical abdominal problems). Possible IV maintenance fluids include half-normal saline plus 5% or 10% glucose. Do not give 5% glucose alone as this can lead to hyponatraemia. See Annex 4 for composition of IV fluids.
10.3. Management of fever
The temperatures given in these guidelines are rectal temperatures, unless otherwise stated. Oral and axillary temperatures are lower by approximately 0.5 °C and 0.8 °C, respectively.
Fever is not an indication for antibiotic treatment and may help the immune defence against infection. High fever (> 39 °C or > 102.2 °F) can have harmful effects, such as:
- reducing the appetite
- making the child irritable
- precipitating convulsions in some children aged 6 months to 5 years
- increasing oxygen consumption (e.g. in a child with very severe pneumonia, heart failure or meningitis).
All children with fever should be examined for signs and symptoms that indicate the underlying cause of the fever, and should be treated accordingly (see Chapter 6).
Antipyretic treatment
Paracetamol
Treatment with oral paracetamol should be restricted to children aged ≥ 2 months who have a fever of ≥ 39 °C (≥ 102.2 °F) and are uncomfortable or distressed because of the high fever. Children who are alert and active are unlikely to benefit from paracetamol.
- ►
Paracetamol dose is 15 mg/kg every 6 h.
Ibuprofen
The effectiveness in lowering temperature and the safety of ibuprofen and acetaminophen are comparable, except that ibuprofen, like any NSAID, can cause gastritis and is slightly more expensive.
- ►
Ibuprofen dose is 10 mg/kg every 6–8 h.
Other agents
Aspirin is not recommended as a first-line antipyretic because it has been linked with Reye syndrome, a rare but serious condition affecting the liver and brain. Avoid giving aspirin to children with chickenpox, dengue fever and other haemorrhagic disorders.
Other agents are not recommended because of their toxicity and inefficacy (dipyrone, phenylbutazone).
Supportive care
Children with fever should be lightly clothed, kept in a warm but well-ventilated room, and encouraged to increase their oral fluid intake.
10.4. Pain control
Correct use of analgesics will relieve pain in most children with pain due to medical illness, when given as follows:
- Give analgesics in two steps according to whether the pain is mild or moderate-to-severe.
- Give analgesics regularly (‘by the clock’), so that the child does not have to experience recurrence of severe pain in order to obtain another dose of analgesic.
- Administer by the most appropriate, simplest, most effective and least painful route, by mouth when possible (IM treatment can be painful and, if shock is present, can delay the effect).
- Tailor the dose for each child, because children have different dose requirements for the same effect, and progressively titrate the dose to ensure adequate pain relief.
Use the following drugs for effective pain control:
Mild pain: such as headaches, post-traumatic pain and pain due to spasticity
- ►
Give paracetamol or ibuprofen to children > 3 months who can take oral medication. For infants < 3 months of age, use only paracetamol.
- –
paracetamol at 10–15 mg/kg every 4–6 h
- –
ibuprofen at 5–10 mg/kg every 6–8 h
Moderate-to-severe pain and pain that does not respond to the above treatment: strong opioids:
- Give morphine orally or IV every 4–6 h or by continuous IV infusion
- If morphine does not adequately relieve pain, then switch to alternative opioids, such as fentanyl or hydromorphone.
Note: Monitor carefully for respiratory depression. If tolerance develops, the dose should be increased to maintain the same degree of pain relief.
Adjuvant medicines: There is no sufficient evidence that adjuvant therapy relieves persistent pain or specific cases such as neuropathic pain, bone pain and pain associated with muscle spasm in children. Commonly used drugs include diazepam for muscle spasm, carbamazepine for neuralgic pain and corticosteroids (such as dexamethasone) for pain due to an inflammatory swelling pressing on a nerve.
Pain control for procedures
Local anaesthetics: for painful lesions in the skin or mucosa or during painful procedures (lidocaine inflitrated at 1–2%)
- ►
lidocaine: apply (with gloves) on a gauze pad to painful mouth ulcers before feeds; acts within 2–5 min
- ►
tetracaine, adrenaline and cocaine: apply to a gauze pad and place over open wounds; particularly useful during suturing
10.5. Management of anaemia
Non-severe anaemia
Young children (aged < 6 years) are anaemic if their Hb is < 9.3 g/dl (approximately equivalent to an EVF of < 27%). If anaemia is present, begin treatment, unless the child has severe acute malnutrition, in which case see section 7.5.2.
- ►
Give (home) treatment with iron (daily iron–folate tablet or dose of iron syrup) for 14 days.
- Ask the parent to return with the child in 14 days. Treat for 3 months when possible, as it takes 2–4 weeks to correct anaemia and 1–3 months to build up iron stores.
- ►
If the child is ≥ 1 year and has not received mebendazole in the previous 6 months, give one dose of mebendazole (500 mg) for possible hookworm or whipworm infestation.
- ►
Advise the mother about good feeding practice.
Severe anaemia
- ►
Give a blood transfusion as soon as possible (see below) to:
- ■
all children with an EVF of ≤ 12% or Hb of ≤ 4 g/dl
- ■
less severely anaemic children (EVF, 13–18%; Hb, 4–6 g/dl) with any of the following clinical features:
- –
clinically detectable dehydration
- –
shock
- –
impaired consciousness
- –
heart failure
- –
deep, laboured breathing
- –
very high malaria parasitaemia (> 10% of red cells with parasites).
- If packed cells are available, give 10 ml/kg over 3–4 h in preference to whole blood. If not available, give fresh whole blood (20 ml/kg) over 3–4 h.
- Check the respiratory rate and pulse rate every 15 min. If either rises or there is other evidence of heart failure, such as basal lung crepitations, enlarged liver or raised jugular venous pressure, transfuse more slowly. If there is any evidence of fluid overload due to the blood transfusion, give IV furosemide at 1–2 mg/kg, up to a maximum total of 20 mg.
- After the transfusion, if the Hb remains as low as before, repeat the transfusion.
- In children with severe acute malnutrition, fluid overload is a common and serious complication. Give packed cells when available or whole blood at 10 ml/kg (rather than 20 ml/kg), and do not repeat transfusion based on the Hb level, or within 4 days of transfusion(see section 7.5.2).
10.6. Blood transfusion
10.6.1. Storage of blood
Use blood that has been screened and found negative for transfusion-transmissible infections. Do not use blood that has passed its expiry date or has been out of the refrigerator for more than 2 h.
Large-volume, rapid transfusion at a rate > 15 ml/kg per h of blood stored at 4 °C may cause hypothermia, especially in small infants.
10.6.2. Problems in blood transfusion
Blood can be the vehicle for transmitting infections (e.g. malaria, syphilis, hepatitis B and C, HIV). Therefore, screen donors for as many of these infections as possible. To minimize the risk, give blood transfusions only when essential.
10.6.3. Indications for blood transfusion
There are five general indications for blood transfusion:
- acute blood loss, when 20–30% of the total blood volume has been lost, and bleeding is continuing
- severe anaemia
- septic shock (if IV fluids are insufficient to maintain adequate circulation; transfusion to be given in addition to antibiotic therapy)
- whole fresh blood is required to provide plasma and platelets for clotting factors, if specific blood components are not available
- exchange transfusion in neonates with severe jaundice.
10.6.4. Giving a blood transfusion
Before transfusion, check that:
- the blood is the correct group, and the patient's name and number are on both the label and the form (in an emergency, reduce the risk for incompatibility or transfusion reactions by cross-matching group-specific blood or giving O-negative blood if available)
- the blood transfusion bag has no leaks
- the blood pack has not been out of the refrigerator for more than 2 h, the plasma is not pink or has large clots, and the red cells do not look purple or black
- the child has no signs of heart failure. If present, give 1 mg/kg of furosemide IV at the start of the transfusion to children whose circulating blood volume is normal. Do not inject into the blood pack.
Make baseline recordings of the child's temperature, respiratory rate and pulse rate.
The volume of whole blood transfused should initially be 20 ml/kg, given over 3–4 h.
During transfusion:
- If available, use an infusion device to control the rate of transfusion.
- Check that the blood is flowing at the correct speed.
- Look for signs of a transfusion reaction (see below), particularly carefully in the first 15 min of transfusion.
- Record the child's general appearance, temperature, pulse and respiratory rate every 30 min.
- Record the times the transfusion was started and ended, the volume of blood transfused and any reactions.

Giving a blood transfusion
Note: A burette is used to measure the blood volume, and the arm is splinted to prevent flexion of the elbow
After transfusion:
- Reassess the child. If more blood is needed, a similar quantity should be transfused and the dose of furosemide (if given) repeated.
10.6.5. Transfusion reactions
If a transfusion reaction occurs, first check the blood pack labels and the patient's identity. If there is any discrepancy, stop the transfusion immediately and notify the blood bank.
Mild reaction (due to mild hypersensitivity)
Signs and symptoms
- itchy rash
Management
- ►
Slow the transfusion.
- ►
Give chlorphenamine at 0.1 mg/kg IM, if available.
- ►
Continue the transfusion at the normal rate if there is no progression of symptoms after 30 min.
- ►
If the symptoms persist, treat as a moderately severe reaction (see below).
Moderately severe reaction (due to moderate hypersensitivity, non-haemolytic reactions, pyrogens or bacterial contamination)
Signs and symptoms
- severe itchy rash (urticaria)
- flushing
- fever > 38 °C (> 100.4 °F) (Note: Fever may have been present before the transfusion.)
- rigor
- restlessness
- raised heart rate
Management
- ►
Stop the transfusion, remove the IV line but not the cannula. Set up a new infusion with normal saline.
- ►
Give 200 mg hydrocortisone IV or 0.25 mg/kg chlorphenamine IM, if available.
- ►
Give a bronchodilator if wheezing (see section 4.6.1).
- ►
Send the following to the blood bank: the blood-giving set that was used, a blood sample from another body site and urine samples collected over 24 h.
- ►
If there is improvement, restart the transfusion slowly with new blood and observe carefully.
- ►
If there is no improvement in 15 min, treat as a life-threatening reaction (see below), and report to the doctor in charge and to the blood bank.
Life-threatening reaction (due to haemolysis, bacterial contamination and septic shock, fluid overload or anaphylaxis)
Signs and symptoms
- fever > 38 °C (> 100.4 °F) (Note: Fever may have been present before the transfusion.)
- rigor
- restlessness
- raised heart rate
- fast breathing
- black or dark-red urine (haemoglobinuria)
- unexplained bleeding
- confusion
- collapse
Note that in an unconscious child, uncontrolled bleeding or shock may be the only signs of a life-threatening reaction.
Management
- ►
Stop the transfusion, take out the IV line, but keep in the cannula. Set up an IV infusion with normal saline.
- ►
Maintain airway and give oxygen.
- ►
Give adrenaline 0.15 ml of 1:1000 solution IM.
- ►
Treat shock.
- ►
Give 200 mg hydrocortisone IV or chlorphenamine 0.1 mg/kg IM, if available.
- ►
Give a bronchodilator, if there is wheezing (see section 4.5.2).
- ►
Report to the doctor in charge and to the blood laboratory as soon as possible.
- ►
Maintain renal blood flow with IV furosemide at 1 mg/kg.
- ►
Give antibiotics as for septicaemia (see section 6.5).
10.7. Oxygen therapy
Indications
Oxygen therapy should be guided by pulse oximetry. Give oxygen to children with an oxygen saturation < 90%. When a pulse oximeter is not available, the necessity for oxygen therapy should be guided by clinical signs, although they are less reliable. Oxygen should be given to children with very severe pneumonia, bronchiolitis or asthma who have:
- central cyanosis
- inability to drink (when this is due to respiratory distress)
- severe lower chest wall indrawing
- respiratory rate ≥ 70/min
- grunting with every breath (in young infants)
- depressed mental status.
Sources
Oxygen should be available at all times. The two main sources of oxygen are cylinders and oxygen concentrators. It is important that all equipment is checked for compatibility.
Oxygen cylinders and concentrators
See list of recommended equipment for use with oxygen cylinders and concentrators and instructions for their use in the WHO manuals on clinical use of oxygen therapy and on oxygen systems.
Oxygen delivery
Nasal prongs are the preferred method of delivery in most circumstances, as they are safe, non-invasive, reliable and do not obstruct the nasal airway. Nasal or nasopharyngeal catheters may be used as an alternative only when nasal prongs are not available. The use of headboxes is not recommended. Face masks with a reservoir attached to deliver 100% oxygen may be used for resuscitation.
Nasal prongs. These are short tubes inserted into the nostrils. Place them just inside the nostrils, and secure with a piece of tape on the cheeks near the nose (see figure). Care should be taken to keep the nostrils clear of mucus, which could block the flow of oxygen.
- ►
Set a flow rate of 1–2 litres/min (0.5 litre/min for young infants) to deliver an inspired oxygen concentration of up to 40%. Humidification is not required with nasal prongs.
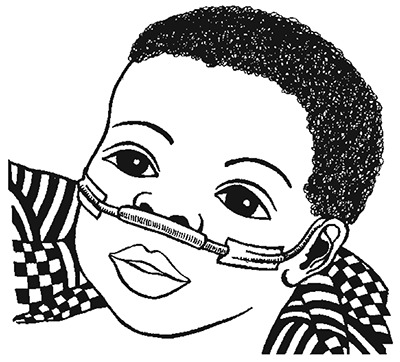
Oxygen therapy: Nasal prongs correctly positioned and secured
Nasal catheter: a 6 or 8 French gauge catheter that is passed to the back of the nasal cavity. Insert the catheter at a distance equal to that from the side of the nostril to the inner margin of the eyebrow.
- ►
Set a flow rate of 1–2 litres/min. Humidification is not required.
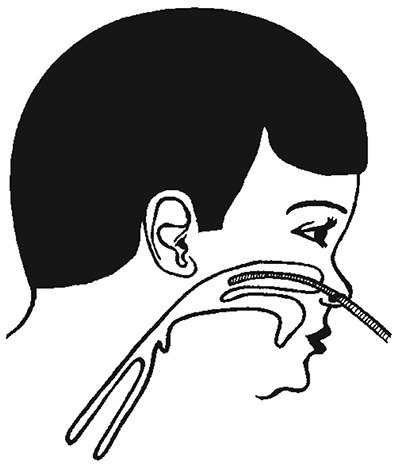
Nasopharyngeal catheter. A 6 or 8 French gauge catheter is passed to the pharynx just below the level of the uvula. Insert the catheter at a distance equal to that from the side of the nostril to the front of the ear (see figure). If it is placed too far down, gagging and vomiting and, rarely, gastric distension can occur.
- ►
Set a flow rate of 1–2 litres/min to avoid gastric distension. Humidification is required.
Monitoring
Train nurses to place and secure the nasal prongs correctly. Check regularly that the equipment is working properly, and remove and clean the prongs at least twice a day.
Monitor the child at least every 3 h to identify and correct any problems, including:
- oxygen saturation, by pulse oximeter
- position of nasal prongs
- leaks in the oxygen delivery system
- correct oxygen flow rate
- airway obstructed by mucus (clear the nose with a moist wick or by gentle suction)
Pulse oximetry
Normal oxygen saturation at sea level in a child is 95–100%; in children with severe pneumonia, this usually decreases. Oxygen should be given if saturation drops to < 90% (measured at room air). Different cut-offs might be used at altitude or if oxygen is scarce. The response to oxygen therapy can also be measured with a pulse oximeter, as the oxygen saturation should increase if the child has lung disease (with cyanotic heart disease, oxygen saturation does not change when oxygen is given). The oxygen flow can be titrated with the pulse oximeter to obtain a stable oxygen saturation > 90% without wasting too much oxygen.
Duration of oxygen therapy
Continue giving oxygen continuously until the child is able to maintain an oxygen saturation > 90% in room air. When the child is stable and improving, take the child off oxygen for a few minutes. If the oxygen saturation remains > 90%, discontinue oxygen, but check again half an hour later and every 3 h thereafter on the first day off oxygen to ensure that the child is stable. When pulse oximetry is not available, the duration of oxygen therapy is guided by clinical signs, which are less reliable.
10.8. Toys and play therapy
Each play session should include language and motor activities and activities with toys. Teach the child local songs. Encourage the child to laugh, vocalize and describe what he or she is doing. Always encourage the child to perform the next appropriate motor activity.
Activities with toys
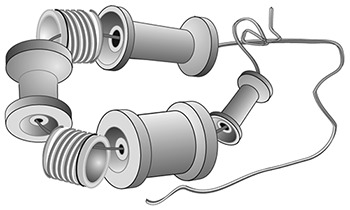
Ring on a string (from 6 months)
Thread cotton reels and other small objects (e.g. cut from the neck of plastic bottles) onto a string. Tie the string in a ring, leaving a long piece of string hanging.
Blocks (from 9 months)
Smooth the surfaces of small blocks of wood with sandpaper and paint in bright colours, if possible.

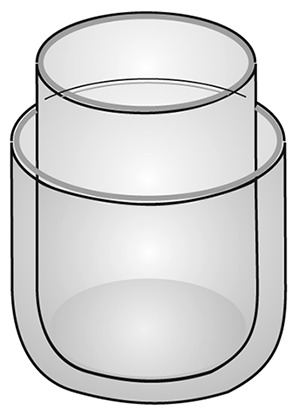
Nesting toys (from 9 months)
Cut off the bottoms of two bottles of identical shape but different size, and place the smaller bottle inside the larger bottle.
In-and-out toy (from 9 months)
Any plastic or cardboard container and small objects (not small enough to be swallowed)

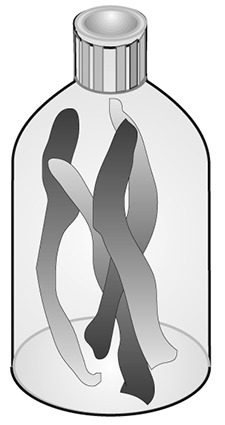
Rattle (from 12 months)
Cut long strips of plastic from coloured plastic bottles. Place them in a small transparent plastic bottle, and glue the top on firmly.
Drum (from 12 months)
Any tin with a tightly fitting lid
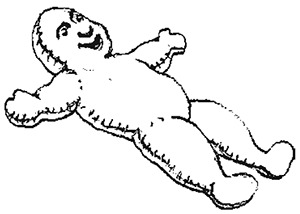
Doll (from 12 months)
Cut out two doll shapes from a piece of cloth and sew the edges together, leaving a small opening. Turn the doll inside-out, and stuff with scraps of materials. Stitch up the opening and sew or draw a face on the doll.
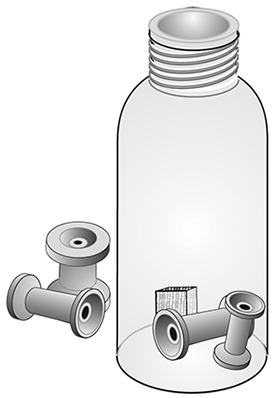
Posting bottle (from 12 months)
Take a large transparent plastic bottle with a small neck, and place small long objects that fit through the neck (not small enough to be swallowed).
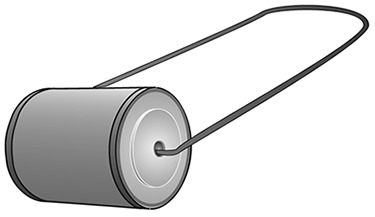
Push-along toy (from 12 months)
Make a hole in the centre of the base and lid of a cylindrical tin. Thread a piece of wire (about 60 cm long) through each hole, and tie the ends inside the tin. Put some metal bottle tops inside the tin and close the lid.
Pull-along toy (from 12 months)
As above, except that string is used instead of wire.

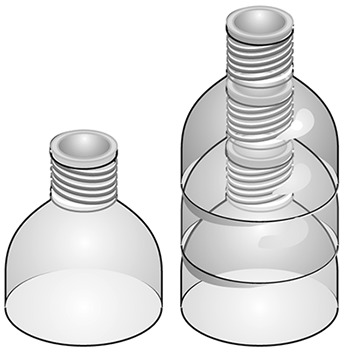
Stacking bottle tops (from 12 months)
Cut at least three identical round plastic bottles in half and stack them.
Mirror (from 18 months)
A tin lid with no sharp edges
Puzzle (from 18 months)
Draw a figure (e.g. a doll) with a crayon on a square or rectangular piece of cardboard. Cut the figure in half or quarters.

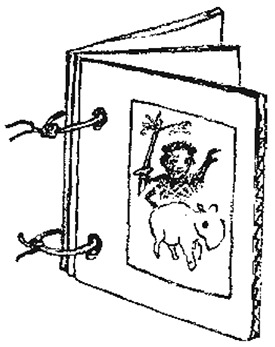
Book (from 18 months)
Cut out three rectangular pieces of the same size from a cardboard box. Glue or draw a picture on both sides of each piece. Make two holes down one side of each piece and thread string through to make a book.
Publication Details
Copyright
All rights reserved. Publications of the World Health Organization are available on the WHO web site (www.who.int) or can be purchased from WHO Press, World Health Organization, 20 Avenue Appia, 1211 Geneva 27, Switzerland (tel.: +41 22 791 3264; fax: +41 22 791 4857; e-mail: tni.ohw@sredrokoob). Requests for permission to reproduce or translate WHO publications – whether for sale or for non-commercial distribution – should be addressed to WHO Press through the WHO web site (www.who.int/about/licensing/copyright_form/en/index.html).
Publisher
World Health Organization, Geneva
NLM Citation
Pocket Book of Hospital Care for Children: Guidelines for the Management of Common Childhood Illnesses. 2nd edition. Geneva: World Health Organization; 2013. 10, Supportive care.