NCBI Bookshelf. A service of the National Library of Medicine, National Institutes of Health.
Walker HK, Hall WD, Hurst JW, editors. Clinical Methods: The History, Physical, and Laboratory Examinations. 3rd edition. Boston: Butterworths; 1990.

Clinical Methods: The History, Physical, and Laboratory Examinations. 3rd edition.
Show detailsHistory
There are five cardinal symptoms of musculoskeletal disease (Table 158.1): pain, swelling, erythema (redness), warmth, and stiffness. Pain is the major symptom. "Aching" or "throbbing" are the words most often used by patients to describe musculoskeletal pain, in contrast to "crushing," "boring," or "sharp" with reference to ischemic, visceral, or neuropathic pain. Pain should also be characterized as to location, positional relationships, frequency, duration, and precipitating or relieving factors. The historical identification of swelling, erythema, and warmth is of great importance. Stiffness is a symptom unique to the musculoskeletal system. The predilection of stiffness for certain times of the day (e.g., upon awakening), its duration and location are points of considerable historical importance. The pattern of involvement should be ascertained: anatomic area, self-limited or progressive, migratory or stationary, effect of treatment modalities. The presence and degree of weakness or other neurologic deficits should be ascertained.
Table 158.1
Major Symptoms of Musculoskeletal Disease.
Physical Examination
The physical examination should be composed of a particular sequence or order that is used on every patient, thereby ensuring completeness. A useful sequence is: general inspection (posture, gait, symmetry); upper extremities, including temporomandibular and chest wall joints; spine and pelvis; and lower extremities (Table 158.2). A goniometer to measure joint angles and a tape measure are the only required instruments (Table 158.3).
Table 158.2
Sequence of the Rheumatologic Examination.
Table 158.3
Instruments Required for Rheumatologic Examination.
General inspection begins by observing the patient in the standing position for postural abnormalities. Observe for erect stance and any abnormal curvature: kyphosis, lordosis or scoliosis. Have the patient walk toward and away from you.
The patient then sits on the examining table facing the examiner. Each joint is assessed for tenderness, swelling, erythema, deformity, or asymmetry (Chapter 164). Range of motion, pain with movement, effusion, crepitus, and stability are noted.
The temporomandibular joint (Chapter 163) is examined first, beginning proximally and working distally (Figure 158.1). Palpation is done with the mouth closed, then open.
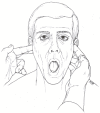
Figure 158.1
Palpation of the temporomandibular joints for crepitus, snapping, of instability.
The shoulder joints (Figures 158.2 and 158.3) and contiguous joints are now examined. Observe, palpate, and assess range of motion of these joints: glenohumeral, acromioclavicular, sternoclavicular, and costochondral. Also examine the gliding tissue space between the scapula and thorax, the shoulder capsule or rotator cuff, and the subacromial bursa. Range of motion is now checked as follows:
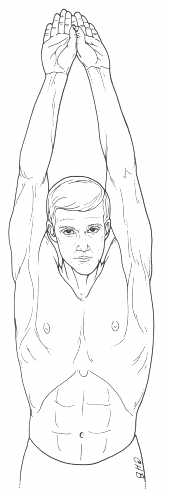
Figure 158.2
Full elevation of the shoulders.

Figure 158.3
Full external rotation of the shoulders.
- Forward flexion: Normal is parallel to floor.
- Arms over head pressed against the ears: Normal is 180 degrees.
- Shoulder adduction: Normal is 90 degrees.
- External rotation: Touch back of neck.
- Internal rotation: Touch back pocket of opposite side.
Proximal musculature is evaluated for strength with the patient abducting both shoulders parallel to the floor and resisting the examiner's downward pressure.
The examiner moves now from the shoulders to the elbows. Examine the depth of the grooves; obliteration is a sign of synovial disease. Look for subcutaneous nodules just distal to the elbow joint. Evaluate range of motion: extension of zero degrees, flexion 160 degrees. Test the radiohumeral joint by having the patient fully pronate, then fully supinate, both hands.
The wrists are next (Figures 158.4, 158.5, and 158.6). Observe and palpate. Ask the patient to press the palms together and elevate the forearms parallel to the floor.

Figure 158.4
Full extension of the wrists.

Figure 158.5
Full flexion of the wrists.

Figure 158.6
Palpation of the wrist for increased skin temperature secondary to inflammation.
Note the skin temperature as you move from the wrist to the hands (Figure 158.7); unless there is joint inflammation, temperature should decrease. Individually observe, palpate, and assess range of motion in the major joints, metacarpophalangeal, proximal interphalangeal, distal interphalangeal. Record grip strength bilaterally (Figure 158.8).

Figure 158.7
Inspection of the hands for erythema, swelling, synovial proliferation, or hypertrophic joint changes.

Figure 158.8
Bilateral grip strength is tested by grasping the examiner's index fingers as tightly as possible.
The patient remains seated for examination of the cervical spine. Observe for lordosis or kyphosis. Palpate for tenderness. Check flexion by having the patient place the chin on the chest (Figure 158.9), and check extension by having the patient look up at the ceiling as far back as possible (Figure 158.10).
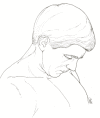
Figure 158.9
Full flexion of the cervical spine (neck).
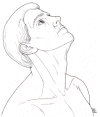
Figure 158.10
Full extension of the cervical spine (neck).
Lateral motion: each ear on shoulder (Figure 158.11).

Figure 158.11
Full lateral bending to the right of the cervical spine (neck).
Rotation: chin on each shoulder (Figure 158.12).

Figure 158.12
Full rotation to the right of the cervical spine (neck).
The patient now stands for further evaluation of the spine. Record the normal curvatures. Palpate over the spinous processes and paravertebral muscles. Check range of motion:
- Flexion: Keep knees straight while touching floor.
- Lateral: Maintain feet together while bending first to one side and then the other.
- Rotary: Turn each shoulder as far to side as possible.
The patient now lies down for examination of the lower extremities. The hip is examined first. Palpation is of value in the greater trochanter area (the bony prominence at the lateral aspect of the hip region). Tenderness suggests trochanteric bursitis. Then the following maneuvers are carried out on the hip:
- Abduction: Fix the pelvis by placing your hand on the side not being tested. Abduct the leg maximally (Figure 158.13).
- Flexion: Pelvis is fixed as above. Flex the hip with knee bent (normal, 120 degrees) and then with the knee straight (normal, 90 degrees).
- External rotation: Ask the patient to place the fifth (small) toe on the table (normal, 60 or more degrees).
- Internal rotation: Normal is 10 to 15 degrees (Figure 158.14).
- Flexion contracture: Opposite knee is flexed until the lumbar lordosis has flattened (Figure 158.15). The hip should be extended fully (flush with examining table), if there is no contracture.
- Straight leg raising: As knee is fully extended, the leg is raised and flexed at the hip; this produces stretch on the sciatic nerve. A positive test is pain in the hip or low back with radiation in the sciatic distribution suggestive of nerve root irritation. The angle of elevation of the leg from the table at the point where the pain is produced is recorded (Figure 158.16).
- Hyperextension: Patient assumes the prone position and is asked to lift the leg off the table as far as possible without raising the pelvis.

Figure 158.13
Abduction of the right hip.

Figure 158.14
Internal rotation of the left hip.

Figure 158.15
Inspection for flexure contracture of the left hip. With pelvis fixed by right hip pulled up in flexion, left leg is extended maximally. The left hip is flush with the table, indicating no contracture.

Figure 158.16
Full extension and leg raising of the right hip.
The knee examination is next. Inspection is carried out for discoloration, swelling, and deformities, particularly lateral angulation (genu varum) or medial angulation (genu valgum). Note any increased skin temperature or swelling and determine if the swelling is due to synovial proliferation or thickening as opposed to an actual effusion. Then the following maneuvers are carried out on the knee:
- Flexion: Note the degree of flexion, which should be at least 135 degrees.
- Extension: Note any deficit in ability to fully extend to 0 degrees.
- Ligamentous laxity: Stretch the medial ligament by placing the palm of the hand on the lateral side of the knee and pulling the leg toward the lateral side of the ankle (Figures 158.17 and 158.18). Correspondingly to stretch the lateral side, place the palm on the medial knee and place the other hand on the lateral ankle and pull toward the examiner. Note any obvious laxity.
- Cruciates: Test the stability of anterior and posterior cruciates by holding the femur in a fixed position with the knee flexed at 90 degrees and attempting to pull and push the tibia forward and backward on the femur. Correspondingly forward movement indicates a defect in the anterior cruciate ligament, whereas backward mobility indicates a defect in the posterior cruciate ligament.
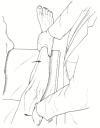
Figure 158.17
Testing medial collateral ligament stability of the right knee. Note counterpressure of ankle laterally stressed as knee is medially stressed.

Figure 158.18
Testing lateral collateral ligament stability of the left knee. Note counterpressure of ankle medially as knee is laterally stressed.
The ankles are examined next. Observe for discoloration and swelling and palpate for increased tenderness.
- Dorsiflexion: The patient is asked to pull the toes up toward the knee (Figure 158.19).
- Plantar flexion: Ask the patient to push the feet down as far as they can go (Figure 158.19).

Figure 158.19
Full plantar and dorsiflexion of the ankles.
Lastly the feet are inspected for abnormal coloration and localized areas of swelling. Look for obvious abnormalities in the longitudinal arch, including a falling of the arch, so-called pes planus or flat foot, or an abnormal elevation of the arch, so-called pes cavus. The first metatarsophalangeal joints are observed for lateral angulation, so-called hallux valgus. The other toes are examined for hammer toe or cock-up deformities, and the metatarsal heads are observed on the plantar surface for formation of callosities over pressure points. Palpate each phalangeal and each metacarpophalangeal joint (Figure 158.20).

Figure 158.20
Palpation of individual interphalangeal joints of the toes for signs of synovial inflammation and restricted joint range of motion.
- Flexion: All toes are actively and passively flexed to their maximum, observing for decreased mobility or evidence of crepitus.
- Extension: The aforementioned small joints of the toes are checked for ability to extend fully.
- Eversion and inversion: Eversion and inversion are primarily a function of the subtalar and tarsal joints, which after checking will complete the peripheral joint examination (Figure 158.21).
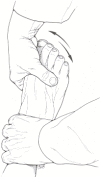
Figure 158.21
Examination of the tarsal joints (midfoot) for eversion (away from the midline) and inversion (toward the midline).
- The effect of age and menopausal status on musculoskeletal symptoms in Chinese women aged 35-64 years.[Climacteric. 2013]The effect of age and menopausal status on musculoskeletal symptoms in Chinese women aged 35-64 years.Gao HL, Lin SQ, Wei Y, Chen Y, Wu ZL. Climacteric. 2013 Dec; 16(6):639-45. Epub 2013 Feb 15.
- Relationship between pain and neuropathic symptoms in chronic musculoskeletal pain.[Pain Med. 2009]Relationship between pain and neuropathic symptoms in chronic musculoskeletal pain.Giske L, Bautz-Holter E, Sandvik L, Røe C. Pain Med. 2009 Jul-Aug; 10(5):910-7. Epub 2009 Apr 22.
- Nonmalignant chronic pain evaluation in the Turkish population as measured by the McGill Pain Questionnaire.[Pain Pract. 2007]Nonmalignant chronic pain evaluation in the Turkish population as measured by the McGill Pain Questionnaire.Oksuz E, Mutlu ET, Malhan S. Pain Pract. 2007 Sep; 7(3):265-73.
- Review Methods of Treating Chronic Pain: A Systematic Review[ 2006]Review Methods of Treating Chronic Pain: A Systematic ReviewSwedish Council on Health Technology Assessment. 2006 Oct
- Review Peripheral nerve entrapment and injury in the upper extremity.[Am Fam Physician. 2010]Review Peripheral nerve entrapment and injury in the upper extremity.Neal S, Fields KB. Am Fam Physician. 2010 Jan 15; 81(2):147-55.
- An Overview of the Musculoskeletal System - Clinical MethodsAn Overview of the Musculoskeletal System - Clinical Methods
Your browsing activity is empty.
Activity recording is turned off.
See more...