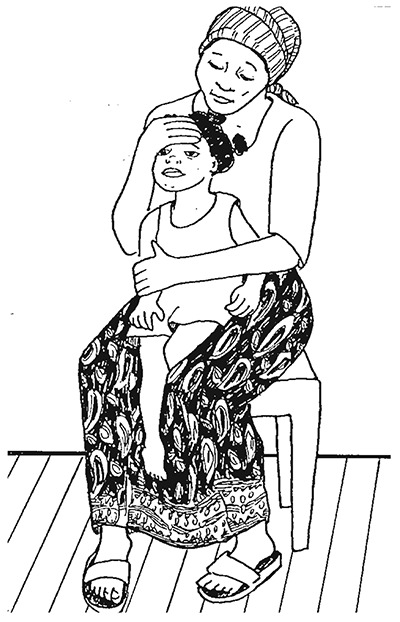
Practical procedures should first be explained to the parents or to the child if she or he is old enough; any risks should also be discussed with them and their consent obtained. Procedures on young infants should be carried out in warm surroundings to avoid hypothermia. Good light is essential. Older children should be told what is to happen. Analgesia should be given when necessary.
Analgesia and sedation for procedures
For some procedures (e.g. chest tube insertion or femoral cannulation), sedation with diazepam or light anaesthesia with ketamine should be considered (see section 9.1.2).
For diazepam sedation, give 0.1–0.2 mg/kg IV. For ketamine, give 2–4 mg/kg IM; this takes 5–10 min to act and lasts for about 20 min.
When giving any sedation or light anaesthesia, manage the child's airway, beware of respiratory depression, and monitor oxygen saturation with a pulse oximeter, when possible. Make sure you have a resuscitation bag available and, if possible, oxygen.
A1.1. Giving Injections
First, find out whether the child has reacted adversely to drugs in the past. Wash your hands thoroughly. Use disposable needles and syringes.
Clean the chosen site with an antiseptic solution. Carefully check the dose of the drug to be given, and draw the correct amount into the syringe. Expel the air from the syringe before injecting. Always record the name and amount of the drug given. Discard disposable syringes in a safe container.
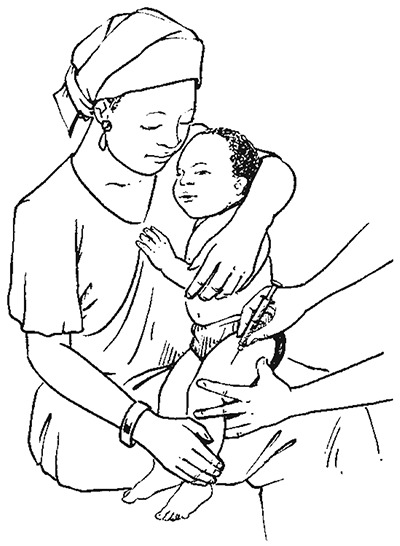
A1.1.1. Intramuscular
In children aged > 2 years, give the injection into the outer thigh or the upper, outer quadrant of the buttock, well away from the sciatic nerve. In younger or severely malnourished children, use the outer side of the thigh midway between the hip and the knee or over the deltoid muscle in the upper arm. Push the needle (23–25-gauge) into the muscle at a 90° angle (45° angle in the thigh). Draw back the plunger to make sure there is no blood (if there is, withdraw slightly and try again). Give the drug by pushing the plunger slowly until the end. Remove the needle, and press a small swab or cotton-wool firmly over the injection site.
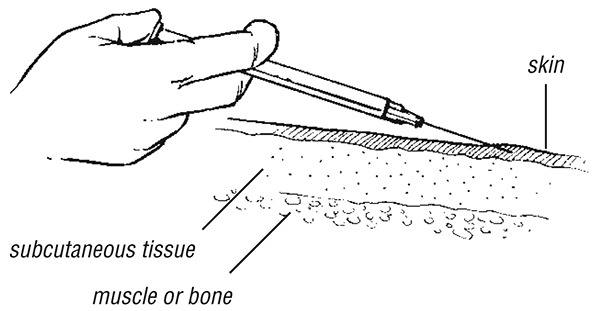
A1.1.2. Subcutaneous
Select the site as described above for intramuscular injection. Push the needle (23–25-gauge) under the skin at a 45° angle into the subcutaneous fatty tissue. Do not enter the underlying muscle. Draw back the plunger to make sure there is no blood (if there is, withdraw slightly and try again). Give the drug by pushing the plunger slowly until the end. Remove the needle and press cotton-wool firmly over the injection site.
A1.1.3. Intradermal
For an intradermal injection, select an undamaged, uninfected area of skin (e.g. over the deltoid in the upper arm). Stretch the skin between the thumb and forefinger of one hand; with the other, slowly insert the needle (25 gauge), bevel upwards, about 2 mm just under and almost parallel to the surface of the skin. Considerable resistance is felt when injecting intradermally. A raised, blanched bleb showing the surface of the hair follicles is a sign that the injection has been given correctly.
A1.2. Giving parenteral fluids
A1.2.1. Insertion of an indwelling intravenous cannula in a peripheral vein
Select a suitable vein to place the cannula or a gauge 21 or 23 butterfly needle.
Peripheral vein
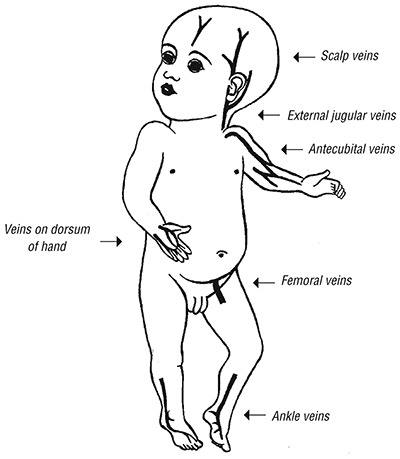
Identify an accessible peripheral vein. In young children aged > 2 months, this is usually the cephalic vein in the antecubital fossa or the fourth interdigital vein on the dorsum of the hand.
An assistant should keep the position of the limb steady and should act as a tourniquet by obstructing the venous return with his or her fingers lightly closed around the limb.
Clean the surrounding skin with an antiseptic solution (such as spirit, iodine, isopropyl alcohol or 70% alcohol solution), then introduce the cannula into the vein and insert most of its length. Fix the catheter securely with tape. Apply a splint with the limb in an appropriate position (e.g. elbow extended, wrist slightly flexed).
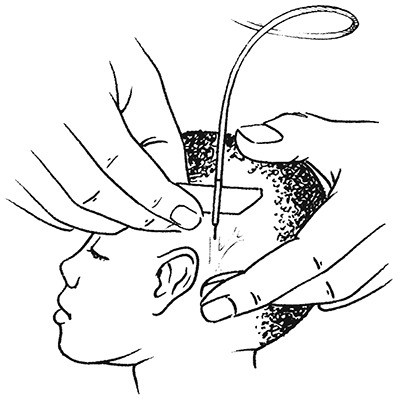
Scalp vein
These are often used in children aged < 2 years but are most suitable in young infants.
Find a suitable scalp vein (usually in the midline of the forehead, the temporal area, or above or behind the ear).
Shave the area if necessary, and clean the skin with an antiseptic solution. The assistant should occlude the vein proximal to the site of puncture. Fill a syringe with normal saline, and flush the butterfly set. Disconnect the syringe and leave the end of the tubing open. Introduce the butterfly needle as described above. Blood flowing back slowly through the tubing indicates that the needle is in the vein.
Care should be taken not to cannulate an artery, which is recognized by palpation. If there is a pulsatile spurting of blood, withdraw the needle and apply pressure until the bleeding stops; then look for a vein.
Care of the cannula
Secure the cannula when introduced. This may require splinting neighbouring joints to limit the movement of the catheter. Keep the overlying skin clean and dry. Flush and fill the cannula with normal saline immediately after the initial insertion and after each injection.
Common complications
Superficial infection of the skin at the cannula site is the commonest complication. The infection may lead to thrombophlebitis, which will occlude the vein and result in fever. The surrounding skin is red and tender. Remove the cannula to reduce the risk of further spread of the infection. Apply a warm, moist compress to the site for 30 min every 6 h. If fever persists for more than 24 h, antibiotic treatment (effective against Staphylococcus aureus) should be given.
Intravenous drug administration through an indwelling cannula
Attach the syringe containing the IV drug to the injection port of the cannula and introduce the drug. Once all the drug has been given, flush with normal saline until all the blood has been expelled and the catheter is filled with the solution.
If infusion through a peripheral vein or scalp vein is not possible, and it is essential to give IV fluids to keep the child alive:
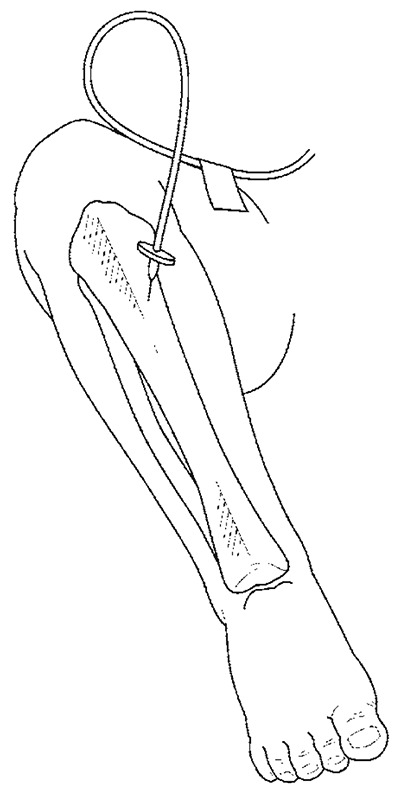
A1.2.2. Intraosseous infusion
Intraosseous infusion is a safe, simple, reliable method of giving fluid and drugs in an emergency when venous access is not possible.
The first choice for the puncture is the proximal tibia. The site for needle insertion is in the middle of the antero-medial surface of the tibia, at the junction of the upper and middle third to avoid damaging the epiphyseal plate (which is higher in the tibia) or at least 1–2 cm below the tibial tuberosity. An alternative site for needle insertion is the distal femur, 2 cm above the lateral condyle.
Prepare the necessary equipment, i.e.:
- –
bone marrow aspiration or intraosseous needles (15–18 gauge or, if not available, 21 gauge). If these are not available, bone marrow needles or large-bore hypodermic or butterfly needles can be used in young children
- –
antiseptic solution and sterile gauze to clean the site
- –
a sterile 5-ml syringe filled with normal saline
- –
a second sterile 5-ml syringe
- –
IV infusion equipment
- –
sterile gloves.
Place padding under the child's knee so that it is bent 30° from the straight (180°) position, with the heel resting on the table.
Locate the correct position (described above and shown opposite).
Wash the hands and put on sterile gloves.
Clean the skin over and surrounding the site with an antiseptic solution..
Stabilize the proximal tibia with the left hand (this hand is now not sterile) by grasping the thigh and knee above and lateral to the cannulation site, with the fingers and thumb wrapped around the knee but not directly behind the insertion site.
Palpate the landmarks again with the sterile glove (right hand).
Insert the needle at a 90° angle with the bevel pointing towards the foot. Advance the needle slowly using a gentle but firm, twisting or drilling motion.
Stop advancing the needle when you feel a sudden decrease in resistance or when you can aspirate blood. The needle should now be fixed in the bone.
Remove the stylet.
Aspirate 1 ml of the marrow contents (looks like blood), using the 5-ml syringe, to confirm that the needle is in the marrow cavity.
Attach the second 5-ml syringe filled with normal saline. Stabilize the needle and slowly inject 3 ml while palpating the area for any leakage under the skin. If no infiltration is seen, star t the infusion.
Apply dressings and secure the needle in its place.
Note: Failure to aspirate marrow contents does not mean that the needle is not correctly placed.
Monitor the infusion by the ease with which the fluid flows and by the clinical response of the patient.
Check that the calf does not swell during the infusion.
Stop the intraosseous infusion and remove the needle as soon as venous access is available. In any case, it should not continue for more than 8 h.
Complications include:
Incomplete penetration of the bony cortex
Signs: The needle is not well fixed; infiltration occurs under the skin.
Penetration of the posterior bone cortex (more common)
Signs: Infiltration occurs, calf becomes tense.
Infection
Signs: Cellulitis at the site of the infusion.
A1.2.3. Central vein cannulation
This should not be used routinely; only when IV access is urgent. Remove the cannula from a central vein as soon as possible (i.e. when IV fluid is no longer essential or when a peripheral vein can be cannulated successfully).
External jugular vein
Hold the child securely, with the head turned to one side away from the puncture site and slightly lower than the body (15–30° head-down position). Restrain the child as necessary in this position.
After cleaning the skin with an antiseptic solution, identify the external jugular vein as it passes over the sternocleidomastoid muscle at the junction of its middle and lower thirds. An assistant should occlude the vein to keep it distended and keep its position steady by pressing over the lower end of the visible part of the vein just above the clavicle. Pierce the skin over the vein, pointing in the direction of the clavicle. A short firm thrust will push the needle into the vein. Proceed with cannulation of the vein, as described above for a peripheral vein.
Femoral vein
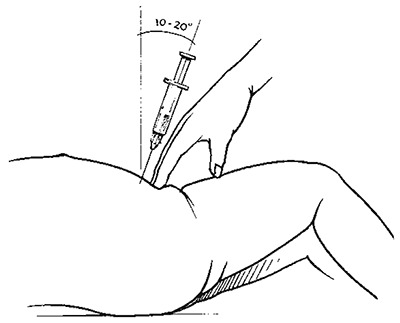
The child should be supine with the buttocks elevated 5 cm on a rolled-up towel so that the hip is slightly extended. Abduct and externally rotate the hip joint, and flex the knee. An assistant should hold the leg in this position and keep the other leg out of the way. If the child is conscious, infiltrate the area with 1% lignocaine.
Clean the skin with an antiseptic solution to ensure that the procedure is aseptic. Palpate the femoral artery (below the inguinal ligament in the middle of the femoral triangle). The femoral vein runs medial to the femoral artery.
Clean the skin with antiseptic. Introduce the needle at 10–20° to the skin, 1–2 cm distal to the inguinal ligament, 0.5–1 cm medial to the femoral artery.
Venous blood will flow into the syringe when the needle is in the femoral vein.
Proceed with cannulation of the vein by advancing the cannula at an angle of 10° to the skin.
Stitch the cannula in place, and put a sterile occlusive dressing on the skin under the cannula and another one over the top of the cannula. Fix firmly in place with adhesive tape. It may be necessary to splint the leg to prevent flexion of the hip.
Monitor the site closely for as long as the cannula is in place, taking care to keep the leg immobile during the infusion. A femoral line can last for up to 5 days with correct care.
Withdraw the cannula after the IV infusion has been given, and apply firm pressure over the site for 2–3 min.
A1.2.4. Venous cut-down
This is less appropriate if speed is essential.
Immoblize the child's lower leg, and clean the skin, as described above. Identify the long saphenous vein, which lies half a fingerbreadth (in the infant) or one fingerbreadth (in the older child) superior and anterior to the medial malleolus.
Infiltrate the skin with 1% lignocaine, and make an incision through the skin perpendicular to the course of the vein. Bluntly dissect the subcutaneous tissue with haemostat forceps.
Identify and free a 1–2-cm strip of vein. Pass a proximal and a distal ligature.
Tie off the distal end of the vein, keeping the ties as long as possible.
Make a small hole in the upper part of the exposed vein and insert the cannula into this, while holding the distal tie to stabilize the position of the vein.
Secure the cannula in place with the upper ligature.
Attach a syringe filled with normal saline, and ensure that the fluid flows freely up the vein. If it does not, check that the cannula is in the vein, or try withdrawing it slightly to improve the flow.
Tie the distal ligature around the catheter, and then close the skin incision with interrupted sutures. Fix the cannula to the skin and cover with a sterile dressing.
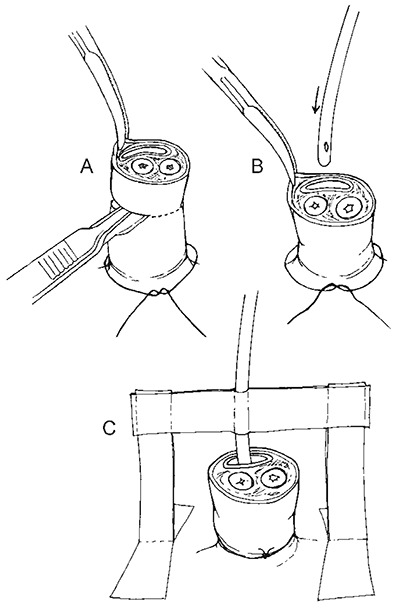
A1.2.5. Umbilical vein catheterization
This procedure can be used for resuscitation or exchange transfusion and is usually possible in neonates in the first few days of life. In some circumstances, it might be possible at up to 5 days of life.
Attach a sterile three-way tap and syringe to a sterile 5 French gauge catheter and fill with sterile 0.9% saline, then close the tap to prevent air entry (which may cause an air embolus).
Clean the umbilical cord and surrounding skin with an antiseptic solution, and then tie a suture around the base of the cord.
Cut the cord 1–2 cm from the base with a sterile scalpel. Identify the umbilical vein (larger gaping vessel) and umbilical arteries (two thicker-walled vessels apart from the vein). Hold the cord (near the umbilical vein) with sterile forceps.
Hold the near end of the catheter with sterile forceps, and advance it into the vein (it should pass easily) for 4–6 cm.
Check that the catheter is not kinked and that blood draws back easily; if there is a block, pull gently on the cord, pull back the catheter partly, and re-insert.
Secure with two sutures into the cord, leaving 5-cm long suture ends. Tape the suture and catheter (see diagram).
After removal, apply pressure to the umbilical stump for 5–10 min.
A1.3. Insertion of a nasogastric tube
Holding the tip of the tube against the child's nose, measure the distance from the nose to the ear lobe, then to the xiphisternum (epigastrium). Mark the tube at this point.
Hold the child firmly. Lubricate the tip of the catheter with water, and pass it directly into one nostril, pushing it slowly in. It should pass easily down into the stomach without resistance. When the measured distance is reached, fix the tube with tape at the nose.
Aspirate a small amount of stomach contents with a syringe to confirm that the tube is in place (check that it turns blue litmus paper pink). If no aspirate is obtained, inject air down the tube and listen over the abdomen with a stethoscope.
If there is any doubt about the location of the tube, withdraw it and start again.
When the tube is in place, fix a 20-ml syringe (without the plunger) to the end of the tube, and pour food or fluid into the syringe, allowing it to flow by gravity.
If oxygen therapy is to be given by nasopharyngeal catheter at the same time, pass both tubes down the same nostril and try to keep the other nostril patent by wiping away crusts and secretions, or pass the feeding tube through the mouth.
A1.4. Lumbar puncture
The following are contraindications:
signs of raised intracranial pressure (unequal pupils, rigid posture or paralysis in any of the limbs or trunk, irregular breathing)
skin infection in the area through which the needle will have to pass
If contraindications are present, the potential value of the information gained from a lumbar puncture should be carefully weighed against the risk of the procedure. If in doubt, it might be better to start treatment for suspected meningitis, and delay performing a lumbar puncture.
Position the child
There are two possible positions:
Lumbar puncture when the child is lying on the side
A hard surface should be used. Place the child on the side so that the vertebral column is parallel to this surface, and the transverse axis of the back is vertical (see next page).
The assistant should flex the back of the child, pull the knees up towards the chest, and hold the child at the upper back between the shoulders and buttocks so that the back is bent. Hold the child firmly in this position. Make sure that the airway is not obstructed and the child can breathe normally. Take particular care in holding young infants. The assistant should not hold a young infant by the neck nor flex the neck to avoid airway obstruction.
Check anatomical landmarks
Locate the space between the third and fourth or between the fourth and fifth lumbar vertebrae. (The third lumbar vertebra is at the junction of the line between the iliac crests and the vertebral column).
Prepare the site
Use aseptic technique. Scrub the hands and wear sterile gloves.
Prepare the skin around the site with an antiseptic solution.
Sterile towels may be used.
In older children who are alert, give a local anaesthetic (1% lignocaine) infiltrated in the skin over the site.
Perform the lumbar puncture
Use a lumbar puncture needle with stylet (22 gauge for a young infant, 20 gauge for an older infant or child; if these are not available, hypodermic needles may be used). Insert the needle into the middle of the intervertebral space, and aim the needle towards the umbilicus.
Advance the needle slowly. The needle will pass easily until it encounters the ligament between the vertebral processes. More pressure is needed to penetrate this ligament, less resistance is felt as the dura is penetrated. In young infants this decrease in resistance is not always felt, so advance the needle very carefully.
Withdraw the stylet, and drops of CSF will pass out of the needle. If no CSF is obtained, the stylet can be reinserted and the needle advanced slightly.
Obtain a sample of 0.5–1 ml CSF, and place in a sterile container.
Withdraw the needle and stylet completely, and put pressure over the site for a few seconds. Put a sterile dressing over the needle puncture site.
If the needle is introduced too far, a lumbar vein may be punctured. This will result in a ‘traumatic tap’, and the spinal fluid will be bloody. The needle should be withdrawn and the procedure repeated in another disc space.
A1.5. Insertion of a chest drain
Pleural effusions should be drained, except when small. It is sometimes necessary to drain both sides of the chest. You may have to drain the chest two or three times if the fluid keeps coming back.
Diagnostic procedure
Consider giving the child sedation or light anaesthesia with ketamine.
Wash the hands and put on sterile gloves.
Lay the child on the back.
Clean the skin over the chest with an antiseptic solution (for example, 70% alcohol).
Select a point in the mid-axillary line (at the side of the chest) just below the level of the nipple (fifth intercostal space, see ).
Inject about 1 ml of 1% lignocaine into the skin and subcutaneous tissue at this point.
Insert a needle or catheter through the skin and pleura and aspirate to confirm the presence of pleural fluid. Withdraw a sample for microscopy and other tests, and place in a container.
If the fluid is clear (straw-coloured or brownish), pull out the needle or catheter after withdrawing enough fluid to relieve distress, and put a dressing over the puncture site. Consider a differential diagnosis of TB (see section 4.7.2).
If the fluid is thin pus or cloudy (like milk), leave the catheter in place so that you can draw out more pus several times a day. Make sure you seal the end of the catheter so that no air can get in.
If the fluid is thick pus, which cannot pass easily through the needle or catheter, insert a chest tube (see ).
Insertion of a chest tube
Select and prepare the site as described above.
Make a 2–3-cm skin incision along the line of the Intercostal space, just above the rib below (to avoid damaging the vessels which lie under the lower edge of each rib).
Use sterile forceps to push through the subcutaneous tissue just above the upper edge of the rib, and puncture the pleura.
Pass a gloved finger into the incision and clear a path to the pleura. (This is not possible in infants.)
Use the forceps to hold the drainage catheter (16 gauge) and introduce it into the chest for several centimetres, pointing upwards. Ensure that all drainage holes of the catheter are inside the chest.
Connect the catheter to a collection bottle with an underwater seal.
Suture the catheter in place, secure with tape, and apply a gauze dressing.
Needle thoracocentesis
This procedure is used for a rapidly deteriorating patient who has a life-threatening tension pneumothorax (see section 4.3.3). In such cases, immediate insertion of a chest drain may subsequently be necessary
Identify the second intercostal space in the mid-clavicular line on the side of the pneumothorax (the opposite side to the direction of tracheal deviation and the same side as the hyper-resonance).
Swab the chest wall with antiseptic or an alcohol swab.
Attach the syringe to the over-needle or intravenous cannula.
Insert the cannula into the chest wall, just above the rib below, aspirating all the time.
If air is aspirated, remove the needle, leaving the plastic cannula in place.
Tape the cannula in place, and proceed to insert the chest drain as soon as possible.
A1.6. Supra-pubic aspiration
Aspirate to a depth of 3 cm in the midline at the proximal transverse crease above the pubis with a 23-gauge needle under sterile conditions. Do this only in a child with a full bladder, which can be demonstrated by percussion. Do not use urine bags to collect urine because the specimens may become contaminated.
Have a clean urine jar ready in case the child passes urine during the procedure.
A1.7. Measuring blood glucose
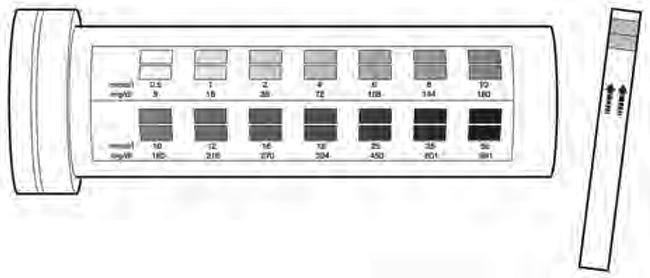
Blood glucose can be measured with a rapid diagnostic test (e.g. Dextrostix®) at the bedside, which provides an estimate of blood glucose within a few minutes. There are several brands on the market, which differ slightly in how they should be used. Instructions on the box and the package leaflet must therefore be read before using them.
Generally, a drop of blood is placed on the reagent strip and left for 30 s to 1 min, depending on the brand of strip. The blood is then wiped off, and after another fixed period (e.g. 1 further minute), the colour change on the reagent field of the strip is read and compared with a colour scale printed on the box. This allows estimation of the glucose level within a certain range, e.g. between 2 and 5 mmol/l, but does not allow exact determination.
Some strips come with an electronic reading machine, which has a battery as a power source. After the blood is wiped off, the strip is inserted into the reading machine, which provides a more accurate value.
As the reagents deteriorate with exposure to ambient humidity, they must be kept in a closed box, and the box must be closed again immediately after a strip has been taken out.